Network storage server
Central Axis
TM
Quick Start Guide
Table of Contents
Welcome .................................................... 1
Product Diagram ......................................... 2
Windows Installation .................................... 3
Macintosh Installation ................................ 12
Support .................................................... 22
FCC Declaration of Conformance .................. 23
1
Welcome
By choosing the Central Axis
™
network
storage server, you have chosen a
simple, cost-effective way to back up
the data on the computers on your
small network.
Please review the following information
to set up and begin using your new
storage server.
2
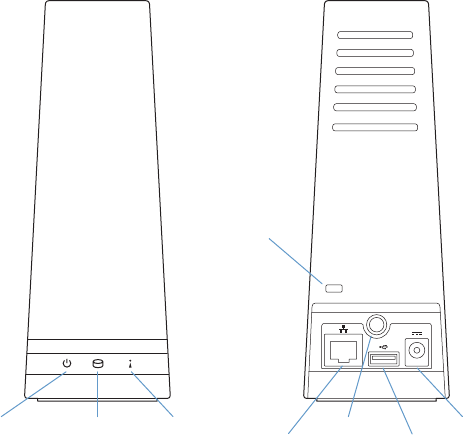
Product Diagram
Power
light
Power
jack
Status
light
Hard disk
activity light
USB
connector
Ethernet
connector
Power
switch
Kensington
lock slot
3
Part 1:
Plug it in.
1. Connect one end of the supplied Ethernet
cable to an Ethernet port on your router
or switch.
2. Connect the other end of the Ethernet
cable to the Ethernet port on your
Central Axis storage server.
3. Connect the round plug of the power
supply to the Central Axis storage server
power jack.
4. Connect the standard electrical plug
of the power supply to your AC
power source.
Part 2:
Turn it on.
1. Press the power button on the back of
your Central Axis storage server. On the
front panel, the power light on the left
illuminates and the status light on the
right flashes. The hard disk activity light
in the center flashes intermittently.
2. Wait for the status light to shine steadily.
For more information about the drive
LEDs, see the Maxtor Central Axis User
Guide for Windows found on the CD.
Windows XP or Vista Installation
4
Part 3:
Install the software.
1. Insert the Maxtor Central Axis storage
server CD into your computer. The
Welcome screen opens automatically.
Note: If the Welcome screen doesn’t open, browse to
the CD and double-click the Launch.exe file.
2. Follow the on-screen instructions to
install the software.
3. When the software installation is complete,
a Maxtor Manager icon appears on your
desktop:
4. Double-click the Maxtor Manager icon.
The Maxtor Manager application opens
on your desktop and searches for Central
Axis storage server devices on your
network. When your Central Axis storage
server is found, its Host Name, IP
address, and MAC address are displayed.
Note: If the message “No Central Axis storage server
drives were found” appears, visit our support website
at http://support.seagate.com and click
TROUBLESHOOTING for tips.
5
Part 4:
Set Up the Central Axis Storage Server.
Here’s what you’ll do to set up your
Central Axis storage server:
s 3ETUPYOUR#ENTRAL!XISSTORAGESERVER
and set an administrator password on
the Central Axis storage server admin web
page so non-administrators cannot change
your settings.
s 3ETUPA#ENTRAL!XISSTORAGESERVER
user account in the Maxtor Manager
application on your desktop so you can
copy data onto the Central Axis storage
server or schedule backups to it.
s #REATEAFREE3EAGATE'LOBAL!CCESS
ACCOUNTONTHE3EAGATE'LOBAL!CCESS
website so you can access files stored on
your Central Axis storage server from any
computer with an Internet connection.
s ,INKYOUR3EAGATE'LOBAL!CCESS
account and your Central Axis storage
server account using the Maxtor Manager
APPLICATIONSO3EAGATE'LOBAL!CCESS
knows which files on the Central Axis
storage server to show you. As you use
the Maxtor Manager application on your
desktop, click the ? Help button found in
every window for detailed information or
view the user guides found on the Maxtor
Central Axis storage server CD.
6
Set Up the Central Axis Storage Server
and Set an Administrator Password:
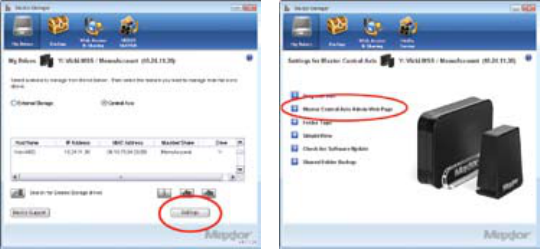
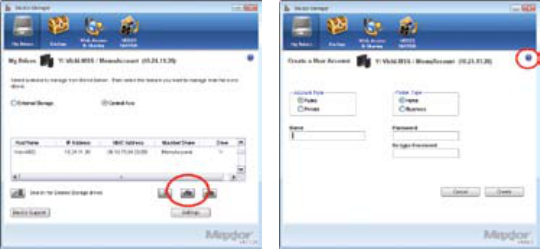
Step 1: In the Maxtor Manager application,
click Settings in the My Drives window:
Step 2: In the Settings window, click
Maxtor Central Axis Storage Server
Admin Page:
Note: In order to set up Web Access and Sharing for the
data in an account, the account has to be private.

7
The first of three Setup pages opens: Step 3: Provide the required information
on the three Setup pages to set up your
Central Axis storage server, including the
creation of an admin password on the
second Setup page.
Note: When you create an “admin” password, you’re
automatically assigned the username admin.
After you complete the setup wizard, you’re
prompted to log in.
s 9OURUSERNAMEISadmin.
s 9OURPASSWORDISTHEADMINPASSWORD
you just set in the Setup page.
Whenever you log into the Central Axis
storage server admin page, your username
will be admin and your password the one
you set here.
Click ? Help on any of the three Setup pages
or view the Maxtor Central Axis Storage
Server Admin User Guide found on the
Maxtor Central Axis storage server CD for
detailed information on setting up your
Central Axis storage server and setting an
admin password.
8
Set Up a Central Axis Storage Server
User Account:
Step 1: In the Maxtor Manager application,
click the Create a User Account button in
the My Drives window:
Step 2: In the Create a User Account
window, set up a user account:
Click the ? Help button or view the Maxtor
Central Axis User Guide for Windows found on
the Central Axis storage server CD for detailed
information on creating a user account.
9
Create a Seagate Global
Access Account:
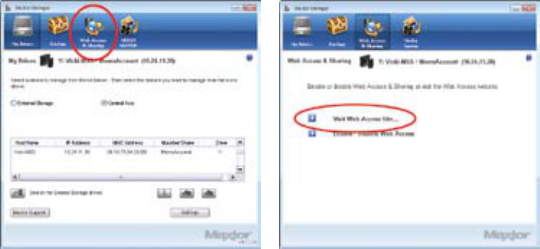
Step 1: In the Maxtor Manager application,
click the Web Access & Sharing icon:
Step 2: In the Web Access & Sharing
window, click Visit Web Access Site:
10
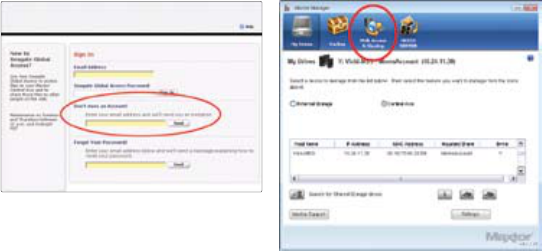
Step 3: /NTHE3EAGATE'LOBAL!CCESSSign In
page, enter your email address below Don’t
Have an Account? and click Send:
An email will be sent to the address you enter.
Step 4: Follow the instructions in the email
to complete the account registration.
Click ? Help or view the Seagate Global
Access User Guide found on the Maxtor
Central Axis storage server CD for detailed
INFORMATIONONCREATINGA3EAGATE'LOBAL
Access account.
Link your Seagate Global Access
Account and your Central Axis Storage
Server Account:
Step 1: In the Maxtor Manager application,
click the Web Access & Sharing icon:
11
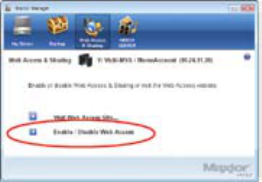
Step 2: In the Web Access & Sharing
window, click Enable/Disable Web Access:
Step 3: Follow the on-screen instructions to
enter your local Central Axis storage server
ACCOUNTINFORMATIONANDTHENYOUR3EAGATE
'LOBAL!CCESSACCOUNTINFORMATION
Click the ? Help button or view the Maxtor
Central Axis User Guide for Windows found
on the Maxtor Central Axis storage server
CD for detailed information about your local
#ENTRAL!XISSTORAGESERVERAND3EAGATE
'LOBAL!CCESSUSERACCOUNTS
User Guides
9OULLlND0$&SOFFOUR-AXTOR#ENTRAL!XIS
storage server user guides in the Guides
folder on the CD to help you use the Maxtor
Central Axis storage server:
s Maxtor Central Axis User Guide for
Windows: Information on using the
components of the Maxtor Central Axis
storage server software installed
on your PC.
s Maxtor Central Axis User Guide for
Macintosh: Information on
using the components of the Maxtor
Central Axis storage server storage server
software installed on your Macintosh.
s Maxtor Central Axis Storage Server
Admin User Guide: Information on using
the admin web page.
s Seagate Global Access User Guide:
Information on accessing files stored on
your Central Axis storage server via the
)NTERNETUSINGTHE3EAGATE'LOBAL!CCESS
service.
12
Macintosh Installation (OS X 10.4.11 or later)
Part 1:
Plug it in.
1. Connect one end of the supplied Ethernet
cable to an Ethernet port on your router
or switch.
2. Connect the other end of the Ethernet
cable to the Ethernet port on your
Central Axis storage server.
3. Connect the round plug of the power
supply to the Central Axis storage server
power jack.
4. Connect the standard electrical plug
of the power supply to your AC power
source.
Part 2:
Turn it on.
1. Press the power button on the back of
your Central Axis storage server. On the
front panel, the power light on the left
illuminates and the status light on the
right flashes. The hard disk activity light
in the center flashes intermittently.
2. Wait for the status light to shine steadily.
For more information about the drive
LEDs, see the Maxtor Central Axis User
Guide for Macintosh found on the CD.

13
Part 3:
Install the software.
1. Insert the Maxtor Central Axis storage
server CD into your computer, open the
CD, and double-click the Maxtor Central
Axis Manager installer.
2. Follow the on-screen instructions to
install the software.
3. When the software installation is complete,
a Maxtor Central Axis Manager icon
appears on your desktop.
4. Double-click the Maxtor Central Axis
Manager icon.
%NTERYOUR-AC/38PASSWORDINTHE
Authenticate window. The Maxtor Central
Axis Manager application opens on your
desktop and searches for Central Axis
storage server devices on your network.
When your Central Axis storage server is
found, its Central Axis storage server ID
and IP address are displayed.
Note: If the message “No Central Axis storage server
drives were found” appears, visit our support website
at http://support.seagate.com and click TROUBLE-
SHOOTING for tips.
14
Part 4:
Set Up the Central Axis Storage Server.
Here’s what you’ll do to set up your
Central Axis storage server:
s 3ETUPYOUR#ENTRAL!XISSTORAGESERVER
and set an administrator password on
the Central Axis storage server admin
web page so non-administrators cannot
CHANGEYOURSETTINGS9OURINSTALLATION
ISCOMPLETE9OUARENOWREADYTOSAVE
your life.
s 3ETUPA#ENTRAL!XISSTORAGESERVERUSER
account in the Maxtor Central Axis
Manager application on your desktop so
you can copy data onto the Central Axis
storage server or schedule backups to it.
s #REATEAFREE3EAGATE'LOBAL!CCESS
ACCOUNTONTHE3EAGATE'LOBAL!CCESS
website so you can access files stored on
your Central Axis storage server from any
computer with an Internet connection.
s ,INKYOUR3EAGATE'LOBAL!CCESSACCOUNT
and your Central Axis storage server
account using the Maxtor Central Axis
-ANAGERAPPLICATIONSO3EAGATE'LOBAL
Access knows which files on the Central
Axis storage server to show you.
As you use the Maxtor Central Axis Manager
application on your desktop, click the
? Help button found in every window for
detailed information or view the user guides
found on the Maxtor Central Axis storage
server CD.
15
Set Up the Central Axis Storage Server
and Set an Administrator Password:
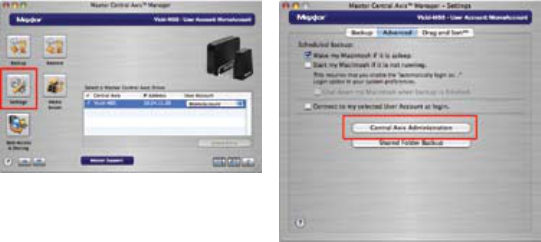
Step 1: In the Maxtor Central Axis Manager
application, click Settings in the main window:
In the Advanced tab of the Settings window,
click Central Axis Adminstration.
16
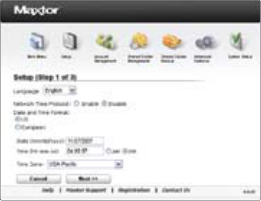
The first of three Setup pages opens: Step 2: Provide the required information on
the three Setup pages to set up your Central
Axis storage server, including the creation
of an admin password on the second
Setup page.
Note: When you create an admin password, you’re
automatically assigned the username admin.
After you complete the setup wizard, you’re
prompted to log in.
s 9OURUSERNAMEISadmin.
s 9OURPASSWORDISTHEADMINPASSWORD
you just set in the Setup page.
Whenever you log into the Central Axis
storage server admin page, your username
will be admin and your password the one
you set here.
Click ? Help on any of the three Setup pages
or view the Maxtor Central Axis Storage
Server Admin User Guide found on the
Maxtor Central Axis storage server CD for
detailed information on setting up your
Central Axis storage server and setting an
admin password.
17
Set Up a Central Axis Storage Server
User Account:
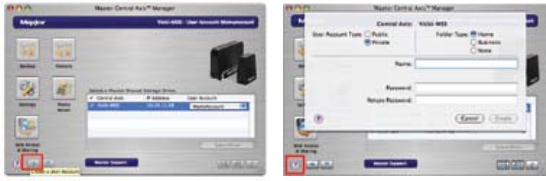
Step 1: In the Maxtor Central Axis Manager
application, click the Create a User Account
button in the main window:
Step 2: In the Create a User Account
window, set up a user account:
Click the ? Help button or view the Maxtor
Central Axis User Guide for Macintosh
found on the Central Axis storage server
CD for detailed information on creating a
user account.
Note: In order to set up Web Access and Sharing for
the data in an account, the account has to be private.
18
Create a Seagate Global
Access Account:
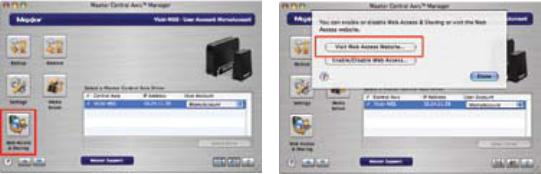
Step 1: In the Maxtor Central Axis
Manager application, click the Web Access
& Sharing icon:
Step 2: In the Web Access & Sharing sheet,
click Visit Web Access Website:

19
Step 3:/NTHE3EAGATE'LOBAL!CCESSSign In
page, enter your email address below Don’t
Have an Account? and click Send:
An email will be sent to the address you enter.
Step 4: Follow the instructions in the
email to complete the account registration.
Click ? Help or view the Seagate Global
Access User Guide found on the Maxtor
Central Axis storage server CD for detailed
INFORMATIONONCREATINGA3EAGATE'LOBAL
Access account.
Link your Seagate Global Access
Account and your Central Axis Storage
Server Account:
Step 1: In the Maxtor Central Axis
Manager application, click the Web Access
& Sharing icon:
20
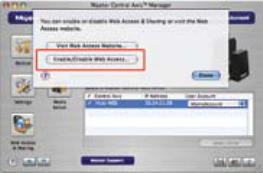
Step 2: In the Web Access & Sharing sheet,
click Enable/Disable Web Access:
Step 3: Follow the on-screen instructions to
enter your local Central Axis storage server
ACCOUNTINFORMATIONANDTHENYOUR3EAGATE
'LOBAL!CCESSACCOUNTINFORMATION
Click the ? Help button or view the Maxtor
Central Axis User Guide for Macintosh found
on the Maxtor Central Axis storage server
CD for detailed information about your local
#ENTRAL!XISSTORAGESERVERAND3EAGATE
'LOBAL!CCESSUSERACCOUNTS
User Guides
9OULLlND0$&SOFFOUR-AXTOR#ENTRAL!XIS
storage server user guides in the Guides
folder on the CD to help you use the Maxtor
Central Axis storage server:
s Maxtor Central Axis User Guide for
Windows: Information on using the
components of the Maxtor Central Axis
storage server software installed on
your PC.
s Maxtor Central Axis User Guide for
Macintosh: Information on
using the components of the Maxtor
Central Axis storage server software
installed on your Macintosh.
s Maxtor Central Axis Storage Server
Admin User Guide: Information on using
the admin web page.
s Seagate Global Access User Guide:
Information on accessing files stored on
your Central Axis storage server via the
)NTERNETUSINGTHE3EAGATE'LOBAL
Access service.
21
We’re Here to Help
4ECHNICAL3UPPORTWILLANSWERTECHNICALAND
troubleshooting questions regarding your
Maxtor Central Axis storage server during
normal call center business hours. Before
calling, note your system configuration and
Maxtor Central Axis storage server model
number. These numbers can be used to
GETHELPFROM3EAGATE3UPPORTREGISTER
your drive and look up information on the
3EAGATEWEBSITE
Please visit www.seagate.com to obtain the
latest comprehensive support informa-
tion— such as:
Knowledge Base
Troubleshooting information, FAQ’s,
and technical documentation.
Software Downloads
Installation software, utilities,
and diagnostics.
Product Index
Current and legacy Maxtor products.
Warranty Services
0RODUCTRETURNS2-3WARRANTYSTATUS
and warranty information.
Product Support
Installation assistance, product
specifications, and user manuals.
Support
22
This device complies with Part 15 of the
FCC Rules. Operation is subject to the
FOLLOWINGTWOCONDITIONSTHISDEVICE
may not cause harmful interference, and
THISDEVICEMUSTACCEPTANYINTERFERENCE
received, including interference that may
cause undesired operation.
Class B
This equipment has been tested and found
to comply with the limits for a Class B digital
device, pursuant to Part 15 of the FCC
Rules. These limits are designed to provide
reasonable protection against harmful
interference in residential installation. This
equipment generates, uses, and can radiate
radio frequency energy and, if not installed
and used in accordance with the instructions,
may cause harmful interference to radio
communications. However, there is no
guarantee that interference will not occur in
a particular installation. If this equipment
does cause harmful interference to radio
or television reception, which can be deter-
mined by turning the equipment off and on,
the user is encouraged to try to correct the
interference by one or more, of the following
measures:
s 2EORIENTORRELOCATETHERECEIVING
antenna.
s )NCREASETHESEPARATIONBETWEENTHE
equipment and receiver.
s #ONNECTTHEEQUIPMENTINTOANOUTLETON
a circuit different from that to which the
receiver is connected.
s #ONSULTTHEDEALERORANEXPERIENCED
radio/TV technician for help.
Caution: Any changes or modifications
made to this equipment may void the user’s
authority to operate this equipment.
FCC Declaration of Conformance

Copyright © 2008 Seagate Technology LLC. All rights reserved. Maxtor and the Maxtor stylized logo
are registered trademarks of Seagate Technology LLC or one of its affiliated companies in the United
States and/or other countries. Central Axis is either a trademark or registered trademark of Seagate
Technology LLC or one of its affiliated companies in the United States and/or other countries. All other
trademarks or registered trademarks are the property of their respective owners. When referring to hard
drive capacity, one gigabyte, or GB, equals one billion bytes and one terabyte, or TB, equals one trillion
bytes. Your computer’s operating system may use a different standard of measurement and report a
lower capacity. In addition, some of the listed capacity is used for formatting and other functions, and
thus will not be available for data storage. Quantitative usage examples for various applications are for
illustrative purposes. Actual quantities will vary based on various factors, including file size, file format,
features and application software. Seagate reserves the right to change, without notice, product
offerings or specifications. Seagate Technology, 920 Disc Drive, Scotts Valley, CA 95066 U.S.A.
PN: 100504899 04/08
maxtor.com
